WooCommerce Tutorials
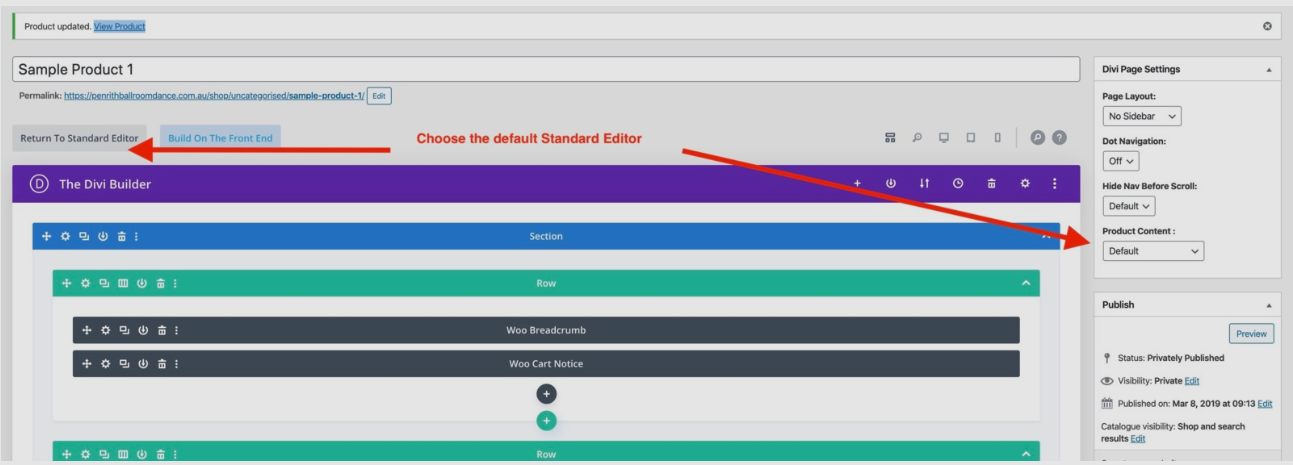
Do NOT enable VISUAL BUILDER
Editing Woo Commerce using the Visual Builder will cause issues and problems on your website.
Please only follow the videos and step-by-step instructions below when editing in Woo Commerce.
Choose the default standard editor as in this screenshot below.

How to Add a New Product
1. Hover to Products tab.
2. Click Add New
How to Add Product Title and Main Description
After clicking Add New in the products tab, a new page will come up that you will have to fill in.
1. Fill in the Title or Name of the product.
2. Fill in the main description area of the product.
How to Choose Product Type
In the product editing area:
1. Go to Product Data module.
2. Choose what type of product you will create. Often times, a regular product like service or a physical product is identified as “Simple Product”. However, choose a “Variable” if the product has its own variety. For examples: Colors, Sizes, Weight, etc. If it is a service, it can have length of time service, number of meeting service, etc.
Grouped products are products that you grouped together. For example, you are selling music tracks, but you also want to sell the entire album. You can set these as a group. External / Affiliate Products are products that you do not own, but you want to link it to an outside sales page using an affiliate link.
If you are going to sell a digital product, tick “Virtual” if it is something that your buyer will just visit online. Tick “Downloadable” if the product is a downloadable product.
3. Put a price.
4. Fill up the short description.
How to Add a Product Image
On the right side of the editing area of the product:
1. Hover over “Featured Image”,
2. Click Set Product Image.
3. Choose what you want to upload for the product, or simple choose an image that you already have uploaded.
4. If you want to put a gallery, hover to Product Gallery module (just below the Featured Image module), then upload images.
How to Edit the Product
You will have to edit the product sometimes.
1. Hover over to Products tab.
2. Click All Products.
3. Hover over the product that you want to edit. You should see links below the title of the product click “Edit”.
4. Start your edits.
How to Edit Product Attributes and Variables
1. Go to Product Data module.
2. Click “Attributes”. From there you can either Add a new Attributes, or edit the current Attributes.
3. Then go to “Variables” (still under Product Data module).
4. You should see different variables of the product. Click the variable that you want to edit or you can add another variation.
How to Edit the Status of an Order
1. Hover to WooCommerce tab.
2. Click “Orders”. You should see people who ordered, when it was ordered and the status of the order.
3. Click the name of the person.
4. Go to “Status” and choose the right status of the order.
5. Go to “Order Actions” and choose the appropriate action that you want to take.
6. NOTE: In order for your customers to receive a final invoice for their order, you will need to choose “Completed”. This will generate an invoice which will be emailed to the customer. You will only do this when you know the payment has arrived into your Stripe account and/or your bank account.
7. Click “Update”.
How to Add a Coupon
1. Hover to “WooCommerce” tab.
2. Click “Coupons”.
3. Click “Add Coupon”
4. Add the Coupon Code that you want to choose.
5. Go to Coupon Date module. Under General, choose what type of discount you want to use.
6. Put the coupon amount.
7. Put an expiry date if required.
8. Click usage restriction tab.
9. Edit or add restrictions.
10. Click “Usage Limits” to set usage limitations.
How to view and download Sales Report
1. Click WooCommerce tab on the left sidebar.
2. Click Reports. You should see tabs: Year, Last month, This month, Last 7 days, Custom…
3. Click the tab that you want to view.
4. On the far right of the tab, click “Export CSV”. This should download the sales report.
DOWNLOAD THE PDF HERE WOOCOMMERCE TUTORIALS
FOR MORE WOOCOMMERCE TUTORIALS PLEASE CLICK HERE (click on Get Started)
